By using the module JobData users can manage database table contents via the JobRouter interface without explicit access to the database. This chapter describes the content maintenance.
The database tables you have access to can be found in the JobRouter navigation menu. Click on the according menu item. The data records of the selected table will be displayed. Alternatively, you can find an overview of all database tables you have access to in Admin Tools | Manage data.
The the data records are listed in the following overview. A filter is available searching in all columns. Additionally, you can change the number of entries displayed per page. Longer texts will be overwritten with "..." from a certain length.
Via the button Rows per page that can be found next to the selection list columns can be displayed and hidden.
Please note: If the result recording for data records was activated in the table management, the performed actions are recorded and can be viewed in the menu Result protocol. The menu can be seen by users with Manage tables right.

Data display
Optimize for large amounts of data
If the setting Optimize for large amounts of data is activated for this table, the search is not performed automatically while making an input, but by a click on the Search button or pressing the ENTER-key.

Display of the search button for large amounts of data
Delete data records
You can delete one or more entries by clicking the checkbox of the respective row and clicking subsequently Delete in the action bar.
")
Delete data records (Confirmation Prompt)
The confirmation prompt shows all selected rows. By clicking Delete all data will be deleted irreversibly.
Add a data record
To add a new data record you can use the button New in the action bar. By clicking on it an edit form will be displayed on the right side of the existing data records. It contains a text box for all available columns of the current table. Here also those are displayed which has not been marked in the table definition As overview .

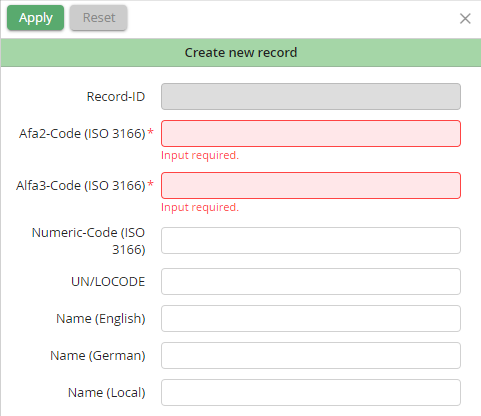
By clicking on the Apply button above the edit form the new data record will be saved in the table. In case of errors during the saving (e.g. if the entry in the text box is too long) these will be displayed below the respective text boxes.
Edit data record
For editing an existing data record click on the requested row in the table. Subsequently the entry will be highlighted in color and the pre-filled edit form will be displayed on the right side of the table.

Edit data
Analogous to Add a new data record, eventual errors will be displayed below the respective text boxes. The changed values will be displayed directly after applying the values for the table.
The edit form can be closed ![]() by using this button. If changes have been performed a confirmation prompt appears asking, if the change should be saved.
by using this button. If changes have been performed a confirmation prompt appears asking, if the change should be saved.
Via the button Reset changes of the data record that have not been saved yet can be discarded. Though here no confirmation prompt will be displayed and the changes performed will be reset directly.
Via the Use as template button it is possible to copy the values of an existing record to create a new one. Thus you can easily create records with partially identical values.
Discard changes (confirmation prompt)
If you have changed data and click on another row without confirming the Apply button, a confirmation prompt will be displayed, where you have the possibility to Apply or Discard the changes. By clicking on Abort the confirmation prompt will be closed and the changed data will be saved in the edit form.
")
Discard changes (Confirmation Prompt)
By  clicking on Abort the changes are discarded.
Changes are in conflict (Confirmation prompt)
If you want to edit a data record, which has been modified or saved by another person already, a confirmation prompt is displayed when clicking on Apply, stating that this data record has been modified already. The buttons Discard and Reload, Overwrite and Cancel are available.
")
Changes are in conflict (Confirmation Prompt)
If you click Discard and Reload, the changes are reset, the currently stored values of the database are loaded and made available for editing in the editing dialog.
By clicking the button Overwrite, your data is saved and the prior modifications of the other user are overwritten.
Cancel is just closing the conformation prompt. The database data are not changed and your changes remain unsaved in the editing dialog.
Export data records
To export the data records of a table the button Excel export can be used. By clicking on this button all data records you have access to will be exported into an Excel file.
Import data records
To import data records the action bar button Excel import can be used. By clicking on it a pop-up window is opened, where an Excel file with the required data records can be uploaded.

Upload an Excel import
Please note: Only data with the extension .xlsx are supported.
When clicking on Continue the uploaded file will be checked for completeness. An imported file muss contain all key and required columns. If one of these columns is missing an error message will be displayed and the import can't be performed.

Error during Excel import
If the import file contains all necessary columns a confirmation prompt will be displayed. During Import and Replace all existing data will be removed from the table and replaced by the data from the Excel file.

Confirmation Prompt during Excel import
If an import could be performed successfully a success message will be displayed.

Success message after Excel import
For the traceability of changes it is possible to activate action recording. The recorded actions can be opened via the context menu of the respective table in the menu Manage tables.
Results can be limited by means of the performed action, the respective data record ID, a date period, or user name.
Please note: If you want to view deleted table data records for an Excel import, it is necessary that the Delete checkbox is activated in the Event Logging tab of the JobData table structure.
Via the Info symbol it is possible to view the details of the single changes.
Please note: The menu is accessible for users with Manage table right.

Result protocol