This working method enables the performance of a JobRouter step from an external application, such as e.g. Google Forms, and the filling of form elements with data, if required.
Therefore, it is necessary to create your JobRouter workflow and the process table fields first.
Example: Google Forms
After registering on Zapier, select the app and the trigger, in this case Google Forms and New Response in Spreadsheet.
Please note:
It is mandatory to initially connect a Google form with a Google spreadsheet (table).
Only then it will be possible to find and choose the spreadsheet in Zapier. It may happen that you will have to create a new Zap and sign in with your Google account.

Google Forms app & event
After that the Zapier access on your Goggle account must be permitted. Sign in with your Google account.
You may get a security message on Google then that draws attention to the access by Zapier.
Select the desired spreadsheet and worksheet subsequently.

Customize request
Now a test can be run to view the results and data.

Google Forms test
Search now for the JobRouter app in Zapier.

JobRouter app
After selecting the JobRouter app the Action Event can be chosen.
At the moment, only the option Start process (start of a new process step) is available.

Start process
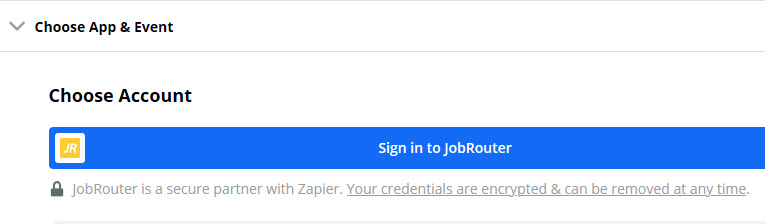
In the next step you must sign in with your JobRouter user name in Zapier.
Enter the JobRouter URL in which the process should be started in the pop-up window.
If you are working with multiple instances, add the instance number additionally. Complete your entry by inserting your JobRouter user name and password.

Enable JobRouter login
Please note:
Please ensure that the final slash / at the end of the URL is not missing!
After the successful login the assignment of the transmitted values from Goggle Forms to the JobRouter process is performed.
First enter the JobRouter process name in the Customize start process section. Then the step number of the step to be performed when the process is started must be inserted.
The process table fields to be filled are selected in the Process table data section. Please enter the respective field name of the process table field. Fields from the transferring application (here: Google Forms) are assigned in the input field on the right. Click the + (plus) symbol to add a new line and to assign further process table fields.
Please note:
Please ensure that the data type of the external application is identical with the type of the JobRouter process table field in which you want to store the data.

Customize start process
After the assignment of the field a test can be run to check the Zap creation.

App test
The Zap is now completed and can be activated in Zapier. As soon as a new form is filled in and sent in Google Forms, a JobRouter process is started.
Please note:
Please keep in mind that all actions in Zapier that are not managed by Webhooks are performed with a time lag. In the free-of-charge version of Zapier (Starter Plan) the synchronization interval takes 15 minutes. In the professional version (Professional Plan) the duration is 5 Minutes.
Example: Workflow with Google Forms:
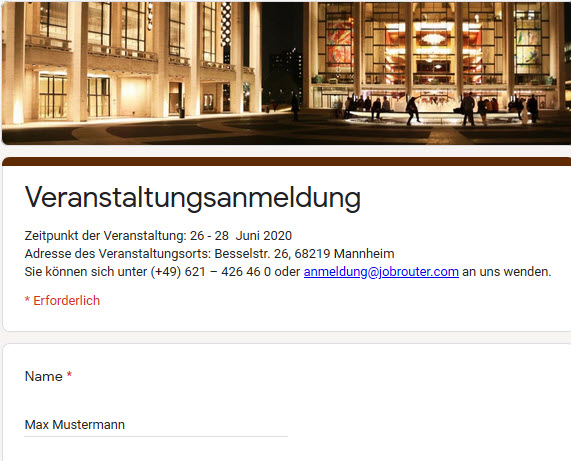
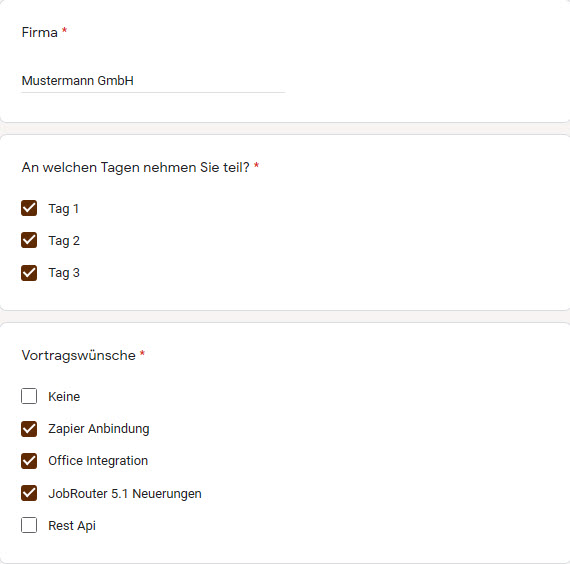
View in JobRouter

JobRouter step
Please note:
Please bear in mind and double-check how the external application transmits the data from JobRouter. Google Forms, for example, is always using the text from the checkbox as checkbox value and writes all filled-in checkboxes in one line in the form of comma-separated strings.
If you want to work with checkboxes in your process as in the example above, the values must be prepared in JobRouter first.